
Installation Guide: X-Maxx / XRT Complete Helical Differential Set
X-Maxx / XRT Complete Helical Differential Set – Installation Guide
The Cobra Racing Complete Helical Differential Set upgrades the front and rear differentials of your Traxxas X-Maxx or XRT with CNC-machined 7075-T6 aluminum housings and hardened-steel helical gears.
This guide covers removal of the factory differentials, installation of the matching helical pinion gears, lubrication, reassembly, and final inspection.
Before You Begin
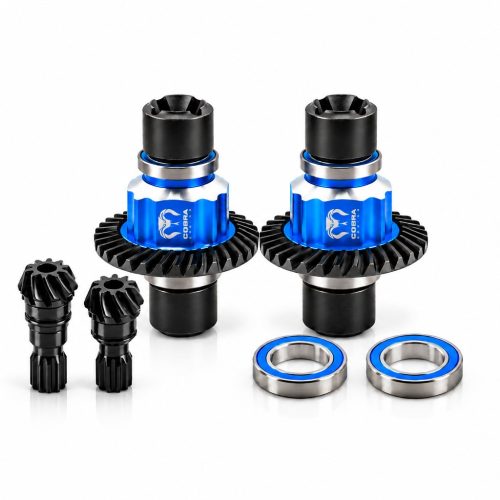
The Cobra Racing kit includes:
- Complete front and rear differential assemblies
- 32T helical ring gears
- Matching 10T front and rear pinion gears
- Differential output cups
- Rubber-sealed bearings
Important: The 32T helical ring gears must be used with the supplied 10T pinion gears. Do not reuse the factory 11T pinions or mix factory and aftermarket gear sets.
Tools and Supplies
- Metric hex drivers, including 2mm, 2.5mm, and 3mm
- Small needle-nose pliers
- RC differential silicone oil
- High-quality gear grease
- Blue medium-strength threadlocker
- Cleaning cloths and a parts tray
Remove both batteries and turn off the vehicle before beginning installation.
Step 1: Remove the Factory Differentials
The X-Maxx and XRT use removable front and rear differential covers. The exact screw sizes and cover arrangement vary by model.
- Remove the bumper mounting screws necessary to access the differential cover. On the XRT, the rear wing mount may also need to be moved aside.
- Remove the screws securing the differential cover.
- Carefully lift off the cover.
- Remove the factory differential assembly. The axle shafts will disengage from the differential output cups.
- Inspect the surrounding housing, bearings, and drivetrain components for damage or debris.
Keep the original hardware organized for reassembly.
Tip: Take a photo of the original differential orientation before removal. This provides a useful reference when installing the replacement.
Step 2: Replace the Factory Pinion Gears
The supplied Cobra Racing 10T helical pinion gears are designed to work with the matching 32T helical ring gears. Both factory pinions must be replaced during installation.
- Locate the factory differential input pinion gear inside the front or rear gearbox.
- Disconnect the corresponding center driveshaft connection as needed to access the pinion assembly.
- Remove the factory pinion gear, following your vehicle's exploded diagram for the bearing and shaft arrangement.
- Inspect the bearings and bearing seats for wear or damage.
- Install the corresponding Cobra Racing 10T helical pinion gear, ensuring all bearings and supporting components are properly seated.
- Verify that the pinion rotates smoothly and is correctly positioned to engage the new helical ring gear.
- Reconnect the driveline components once the differential and pinion have been properly installed.
Important: Always install the supplied Cobra Racing 10T helical pinions with the matching 32T helical ring gears. Do not mix factory straight-cut gears with the new helical gear set.
Do not force components into position or modify the factory gearbox housing.
Step 3: Prepare the New Differentials
Before installing the new assemblies, inspect both differentials.
Check that the housing screws are secure, the output cups rotate properly, and the bearings are seated correctly.
Differential Oil — Required Before Installation
Cobra Racing helical differentials ship dry and must be filled with silicone differential oil before use.
- Remove the screws securing the differential housing.
- Carefully separate the housing components, keeping the gasket properly positioned.
- Fill with your preferred silicone differential oil until the internal spider gears are approximately halfway submerged.
- Reassemble the differential, ensuring the gasket is properly seated.
- Tighten the screws gradually and evenly.
The best oil viscosity depends on your vehicle, driving conditions, and preferred differential action. Refer to your model's factory recommendations as a starting point.
Never operate the internal differential gears dry.
Step 4: Lubricate the Helical Ring and Pinion Gears
The external helical ring and pinion gears require grease.
Apply a coating of high-quality gear grease to the ring and pinion teeth, covering their contact surfaces.
Rotate the gears by hand to distribute the grease across the mesh.
Important: Differential oil goes inside the sealed differential housing. Gear grease is applied outside the sealed housing, where the ring and pinion gears make contact.
These are separate lubrication areas.
Step 5: Install the Cobra Racing Differentials
- Position the corresponding Cobra Racing differential assembly in the factory gearbox.
- Make sure the differential bearings are fully seated in their supports.
- Align the helical ring gear with its matching pinion.
- Carefully engage the axle shafts with the differential output cups.
- Check that the assembly is correctly positioned before installing the cover.
The differential should sit naturally in its mounting location without forcing the bearings or housing into position.
Check Gear Mesh
Before completing reassembly, rotate the differential and pinion by hand.
The gears should engage smoothly without excessive play, skipping, binding, or hard spots.
A slight amount of backlash is normal. The gears should not be forced tightly together.
If the mesh feels rough or excessively loose, inspect the bearing placement, gear orientation, and housing alignment before proceeding.
Do not operate the vehicle if the gears are binding.
Step 6: Reassemble the Gearboxes
- Reinstall the front or rear differential cover.
- Confirm the bearings remain fully seated as the cover is installed.
- Tighten the mounting screws gradually and evenly.
- Reinstall the bumper, skid plate, or wing mount components removed during disassembly.
- Repeat the procedure for the opposite differential.
Apply a small amount of blue medium-strength threadlocker only to appropriate metal-to-metal threaded fasteners. Avoid applying threadlocker to plastic threads or bearings.
Step 7: Final Inspection and Testing
Before powering on the vehicle:
- Rotate the drivetrain by hand and check for smooth operation.
- Verify that both axles and differential output cups are properly engaged.
- Check for unusual resistance, clicking, grinding, or binding.
- Confirm all mounting hardware is secure.
- Inspect for differential oil leaks.
- Make sure both helical ring and pinion gear sets are properly greased.
Final Inspection and Testing
Once installation is complete, rotate the drivetrain by hand to confirm smooth operation and proper gear engagement.
Start with a short, low-speed test run, then gradually increase speed as you normally would with newly installed drivetrain components.
After your first run, perform a quick inspection to ensure everything remains properly secured.
Additional Maintenance Tips
- Inspect differential oil levels and seals during routine service.
- Keep the ring and pinion gears properly greased.
- Replace damaged or rough-running bearings.
- Inspect the output cups and driveshaft connections for wear.
- Address clicking or grinding noises before continuing to drive.
Proper lubrication, bearing support, and gear alignment are especially important for high-power 6S and 8S vehicles.
Need Installation Assistance?
If you have questions about installing your Cobra Racing Helical Differential Set, contact Cobra Racing Support with your order number and vehicle model.
We're happy to help you get your X-Maxx or XRT back on the road!